
 4:45 AM
 T.L. Branson


Step 1: Purchase Powerpoint
Chances are you already have Powerpoint. If you have Microsoft Office, then you have Powerpoint. You'll have to look around. Check your applications folder. Almost every one uses Microsoft Word. Find Word and then look in that area for Powerpoint. If you don't have Powerpoint, then you need to purchase it. The cheapest way is purchase Powerpoint individually, and if you don't already have Word, then you probably haven't needed it so far meaning it would be fine to buy Powerpoint alone.

Step 2: Setup Your Presentation
Begin by opening Powerpoint. The locations of palettes and appearances of menus may be slightly different for you than what you see here because I'm operating on an older version of Powerpoint as well as Mac computer. Everything should be in relatively the same place, though. You don't need to do this first step, but if you don't and you are following these directions to a "T" (including using my slides) then things will look a little different. Go to File > Page Setup, and change the document size to 12 x 8. This is the size of my slides.


Next, let's get familiar with the screen that you see once you open a new presentation. Your slides are located in the upper left hand corner. Currently, we only have one slide, we'll add a few in a minute. If you click where it says, "Click to add title," then you can type in your own information on this blank white slide.

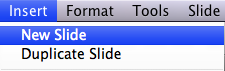 Now let's add a few slides. Go to Insert > New Slide and do that a couple of times. Now you have a few slides. Notice that I now have 4, this tutorial won't need that many, but you will want A LOT more for your church presentation.
But white is dreadfully boring for a Powerpoint, so let's change the background. For my screen, I have a palette called the Formatting Palette off to the right. In there is an option for slide designs. If I click on one of them, the background will change. These are default slides Powerpoint gives you, and you could technically use these in your service and never purchase or download any other slides (they'll just look plain). If you don't have this palette, keep reading, we'll get there.

 To change the background without the Formatting Palette go to Format > Slide Design and the options will be listed for you.
Now we want to insert our own custom slides. To do that, download some here. Then go to Insert > Picture > From File. Find where you saved the files (Make sure you unzip them first), select the Welcome slide and press OK.

Your screen should look like this.

Next, move to the second slide by clicking on it in the upper left hand corner and add the Sermon Title slide.

If you added the Sermon Title slide, you'll need to add your Scripture passage. To do that, we need to add text. This step will show you how to add text anywhere on any slide, not just for this slide. If you have the formatting palette visible, go over to it and click on the item shown in the picture below.

This is a text box. To get there without the Formatting Palette, go to Insert > Text Box. Now click and drag where you want the text box to go. The place created for it on this slide is right below the line.

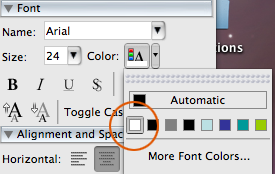
Now before you go typing away, there's a few formatting issues we need to take care of. We need to center the text and turn the color of the font to white (the default is black which won't look good on our dark blue background). Go back to the handy Formatting Palette (by the way, to turn this on go to View > Formatting Palette) and select the Font option. Click the color box and change it to white. Then change the size of the font to 36.
Next select the Alignment option. Click the "Center" alignment button.
Now you're ready to type. If you still don't have the Formatting Palette
out or can't find any of this, you can edit it all by going to Format
> Font.

Type in your Scripture. Your screen should now look like this (almost).

Now just keep adding slides and typing in all your information until you have everything done. To see what you Powerpoint presentation currently looks like, go to Slide Show > View Show. Now we want to add some Custom Animations to spice up your slide transitions. Be careful here, some of the can look tacky. We want our presentations to be sharp and eye catching, not boring or tacky. Go to Slide Show > Custom Animation for this.


To add an animation, click on the picture slide and start browsing the animation gallery. A preview is included when you click on each one so that you can see what it will look like.

Once you have chosen one, you can adjust the speed of the animation if it is too slow or too fast. Do this by selecting the speed option and changing the seconds it takes to complete.

Now click OK. At this point, you know everything you need to know about setting up a Powerpoint presentation. If you have questions or don't understand a particular step, feel free to leave a comment below and I will answer your question as soon as possible. If something is unclear, you can also leave a comment and I will edit the tutorial to make it more understandable.
Step 3: Share It With Your Friends
Did you find this tutorial helpful? Someone else probably would too, share it on Facebook or Twitter by clicking the buttons below.
 Posted in:


0 comments:
Post a Comment