Showing posts with label Church Audio. Show all posts

Thursday, May 10, 2012

Tutorial: How to Design a CD Label

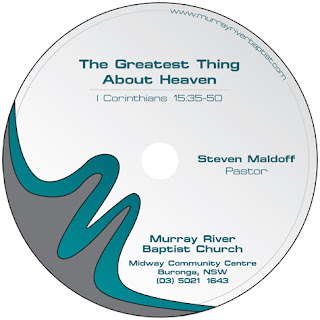
Have you ever had a great idea that turned into a better idea? Like a spark of genius that's so magnificent you couldn't pass it up? Well this is sort of like that, minus the genius part. On Monday I ran an article called Media Tip: Sermon Audio Promotion. In that article, I discussed various methods of getting your CD labels printed. Yesterday, our Design Inspiration for the week left me a little disappointed as to the quality of CD labels that are discoverable on the net. Because of this, I decided to design my own CD label for Murray River Baptist Church to come up with something professional. Here are my results.
Clean CD Label Design
I liked it so much and it was so simple to make that I thought you might be interested in learning how I did it. This is my first tutorial article and I hope you find it useful. I created this CD label in Adobe InDesign, though I assume it could be created just as easily in Adobe Photoshop. To start, download a free CD template. Then unzip the file, and open the document UD100.indd.

First, click on your layers palette and unlock the locked layers.

InDesign Layers Palette

You don't need half of the margins and things they use, so delete everything except the bare minimum outlines as seen below.

CD Template

Click back up to the "Your Artwork" layer, and let's begin working on the CD itself. Begin by making a new circle to match the blue guide leaving the outline black and the fill transparent for now. You will also need to create one for the inner blue guide. Make this one have a white fill with no outline.


Next, we'll make a gradient across the background. Select the gradient palette. Choose linear. Set the colors to white on the left and 15% Black on the right. To do this, create a new swatch and set it at C=0, M=0, Y=, K=15. Using the gradient tool, click and drag from the start point, below, to the end point.


Add Gradient

Now we'll create the inner circle. Make another circle, slightly smaller than the other one. If you have a printer that will print the label directly to the edge of the CD, then don't worry about the green line and make our circle just outside of it. Set the color to 20% Black using the same steps as above.


I chose to put the church website on the edge of the CD. You don't have to if you don't want to, but I think it looks nice. Copy the circle you just made, Cmd+C (Ctrl+C), and Paste in place, Cmd+V (Ctrl+V). Grab your Text on a path tool. If you've never used this, click and hold down the Text tool and you'll see the option appear. Now click on the path where the beginning of the text starts. Type in what you want. Go to the character palette, Cmd+T (Ctrl+T), and adjust the Drop caps setting so that the text drops down into the line.
Add Website URL


Now, using the selection tool (black arrow), click on the layer and turn off the stroke. The first circle that you made should still be behind the text with the stroke present. Next you need to create a box with the pen tool to cover up a portion of the line behind the text. Mimic the picture below. You will need to place this box behind the text, but in front of the line. Adjust this using the shortcut Cmd+[ or Cmd+]. Set the fill to white so you can see what you are doing.


Next, with the box you just created still selected, shift click onto the gradient background you made, selecting both. Repeat the gradient step and this will make the box have a gradient flush with the background so that you will never even know it's there.


Add your logo or design in the corner. I tweaked this one a little bit to make it flow nicely off the CD, however if you scroll to the end of this tutorial, you'll see another CD I made for a different church that doesn't have this. You can do something similar to that if you don't know how to manually manipulate the logo.

Logo on CD

I also added a gray fill behind the logo. You may decide to do something like this, or you may not. I used the pen tool to create a shape that fits underneath the logo and gave it a gray fill.


We're almost finished now. You just have to add your text. For the sermon titles, I made the name of the sermon bold and slightly larger in size than the Scripture passage. I adjusted the leading of the Scripture a little bit to add some extra space between it and the sermon title. Then I added a line using the Line tool and made the stroke the same 20% Black as the ring on the inside of the CD.

Sermon Title

Then I added the church details, making sure the text fit inside the green line, just in case.


Finally, I added the Pastor's name, since he is the one who preached the sermon. I did not include a for sermon, you could do that if you like, I just didn't know where to put it without cluttering up the nice design, so I left it out. You aren't likely to preach the same sermon again, and even if you do, would you need a different CD?


Here is the finished product.


Also, here is the other CD label I designed with a different logo that I told you about earlier.

Clean CD Label Design

If you liked this tutorial, or found it useful. Please let me know. I will try to make some more tutorials in the future, sharing with you how I do what I do so that you, too, can do it. I would also encourage you to share this tutorial on Facebook or Twitter. You never know if one of your friends could use this tutorial right now.

Wednesday, May 9, 2012

20 CD Label Designs

I had a really, really (and I mean REALLY) hard time finding good CD label designs. I would like to stick with a certain theme each week and deliver you with the total package on that theme. This week's Media Tip featured a portion on printing CD labels for your church. Well today's Design Inspiration post is about church or Christian CD labels.

I want you to do something. Yes, physically do something. If you have a CD from your church or another church lying around your house, go and get it. I mean it. Go and get it. ...I'm waiting for you to go get it. So hopefully you went and got it, or maybe you don't have one on hand. If you don't have one, go take a look the next time you are at church. Take at look at the design on your church CDs. Chances are they can be improved. Like, really improved. The problem is there aren't a lot of good examples of what your CDs should look like. For this reason I'm preparing a tutorial for creating clean CD label designs that will be featured tomorrow.

Here are 20 good (and I use that term loosely) CD designs to inspire that creative flare we all know you have.

These first couple are just random designs I found around the web in no particular order. Nothing is exceptionally WOW about these, but they are better than a lot of the boring generic stuff I found (Pictured right. Yuck!)


This next set is from CreationSwap. They cost money, about $7, to purchase the whole set. I believe it gives you the PSD and so you could purchase the design, change all the text, and then use it for your church if you wanted. The intention is to be for a one-time event, however, you could use it as your generic church CD if you so desired. You can find a few more designs here.


The best designs I found were on a new design blog I discovered called EntheosWeb. The designs they posted are pretty cool, but they too cost money if you desire to purchase them. Otherwise, just use them for inspiration in designing your own CD labels. Check out the full post here. There are several very clean designs here without any particular theme obvious. Some of them, though, are a little cluttered, but still very colorful and better than the ones above.


Do you feel inspired? Is your brain just welling with ideas after seeing these designs? Maybe you should go write it down. No, seriously, go write it down before you forget it. Then share your designs with your pastor. It's a way that you can help your church out and get involved in serving God.

Have any particular designs you want to see? Maybe posters? Maybe church bulletins? I'd like to hear about it. I want to focus our content to you, the reader, so that it benefits you the best. There are several ways you can do this. Leave a comment in the box below or click the link above called "Suggest a Topic."

Tuesday, May 8, 2012

A Simple Guide to Audio Recording

A Simple Guide to Audio Recording
I am not going to cover setup of a full sound system. Instead, this will guide will help you make audio recordings the cheapest way possible for low budget churches, assuming the reason you don't have one already is because you are a low budget church.

Step 1: Purchase an MP3 Player/Recorder
Firstly, you will need some sort of recording equipment. You can purchase something as cheap as a Sony Digital Flash Voice Recorder for $60 or as expensive as the Roland R-05 MP3 Recorder for $250. The difference is in the quality of the recording and clarity of the audio. You may want to start of with the cheaper equipment, and as your ministry grows, then purchase the more expensive. If the recorder you decide to purchase does NOT come with a lapel microphone, you can purchase one just about anywhere. Most recorders will probably come with internal memory. The Sony has 2 GB of internal space. However, covering all possibilities, you made need to purchase a memory card if necessary. Though you probably have one lying around your home somewhere if you happen to need one. I've got 6-8 of them, I think.

Step 2: Record Your Sermon
I would suggest reading the instructions before recording your sermon, but most recorders should be fairly simple and I don't think I would cause anything bad to happen by telling you to just plug in the lapel, hit record, and start talking. Make sure you've got a memory card in it (if it needs it) and that it's all charged up of course. No use trying it out when the batteries dead. That's one way make sure it doesn't record anything!

Step 3: Download to Your Computer
The MP3 recorder should come with a USB cable. Connect the cable to the recorder and to the computer. Something should pop up on your screen, whether that be a download dialog box, a folder, or an icon on your desktop. If nothing appears, open "My Computer" and look for it where you'd find a CD or other drive. It should function much like a flash drive if you have one. Copy the file from your recorder to your desktop.

Monday, May 7, 2012

Media Tip: Sermon Audio Promotion

I was sitting in church yesterday morning when my pastor, Dr. Mike Davis of Pine Forest Estates Baptist Church, made a routine comment that he says at least twice a month. He said, "Don't forget that we have CDs of the sermons available for you in the back. Let me encourage you to take one of these and pass them out to someone who doesn't go to our church. It wouldn't have to be confrontational, you could just say, 'This week, my pastor said something interesting. Would you listen to it and let me know what you think about it?'" As he held one of those CDs up in front of the auditorium, I got the idea for this week's Media Tip. As I went back there to pick up a CD as an example for this article, I saw two other people picking up CDs because of what pastor had said. It really does work. Try it some time!

There are a number of ways that you can use sermon audio to expand your ministry or promote your church. Most churches have some form of audio recording system already setup. For the longest time, the church I attended growing up used audio cassettes, but now they've moved to CDs, too. If you don't have an audio recording system already setup, or if you are a new church and can't afford a full sound system, my short audio setup guide is for you. If you already have a sound system setup, skip the guide and move on to how you can use this ministry for the benefit of your church.

Online Listening
The first avenue you ought pursue is uploading your sermon to an online listening/download service. The best and most popular of one of these is SermonAudio.com, however it costs $20/mo, a small price to pay for doubling or tripling your current ministry, but there are some free options out there.

So why should you use SermonAudio? I wouldn't have even really thought much of it until I interned with Murray River Baptist Church in the summer of 2010. Pastor Steven Maldoff uploads all of his sermons to SermonAudio. MRBC has about 60 people in attendance every Sunday morning in rural Australia; to put it quite plainly, in the middle of nowhere (but I love it there). Steven also receives about 60 sermon downloads a week from all over the world. A recent Facebook post by MRBC stated his sermons have been downloaded in France, Germany, India, the Philippines, Ireland, Japan, Malaysia, Nigeria and a host of other places. If a small church can receive that type of exposure on SermonAudio, everyone ought be doing it. Don't be discouraged by low numbers at first, Steven has been posting sermons for 2-3 years to get where he is.

Other benefits include:
• Allowing people who missed the service to catch it at their convenience
• Allowing people to listen to it again because they loved it so much
• Allowing you to have archive all of your sermons by category and not having to deal with the hard drive space yourself.

SermonAudio.com
Go to sermonaudio.com and signup for an account. Setup a profile for yourself and for your church. I've never had a SermonAudio account, so I can't really tell you what to do next, but I'm assuming there will be a big bright red flashy button saying "Click me" to upload your sermons. If it's not blaringly obvious, read the following instructions from SermonAudio about encoding and uploading.

Free Options
These include sermoncentral.com and sermoncloud.com. I would suggest Googling "Sermon Downloads" and selecting one of the top options. Anyone who looks for sermons will likely search through that keyword. You can start with the free option if you'd like, and upgrade later. Another possibility is uploading your sermon to all of these sites. If your goal is to expand your audience, this would be the best option. It may take a little bit more work, but you will catch all of the listeners who exclusively use only those sites.


CDs For Your Church
Regardless of whether or not you upload your sermons to the internet, you will want to pursue making CDs for your church.

Direct CD Printing
This route will cost the most amount of money upfront, but is by far the best design option. This requires a printer capable of printing on CDs (the cheapest being $150). Plus software to design the labels ($21.95). However, you will save on supplies. Purchasing 50 printable CDs costs $25, while 50 regular CDs costs $18 and labels cost $15 for a total of $33. But, that's only saving $8 for every 50 CDs. It would take approximately 1,050 CDs to pay off the printer and software.

Print Homemade Custom Labels
This involves the other supplies listed above. You still need a printer, but the one you already have will probably suffice. You need to buy both blank CDs and CD labels every time you run out. Most CD label kits come with an applicator ($25). After you purchase one, install the software that comes with it, design your CD cover, and start printing those sheets of labels. Peel off the label, lay it printed-side down on the applicator, put the CD top down next, then push the button. If you decide not to use an applicator be prepared for wrinkles in your label or off-center applications. Things like that would drive me nuts!

Order Pre-printed CDs
This is the route that my church uses. It costs roughly $450 for 1,000 discs depending on where you order. Compare this with buying 50 printable CDs at $25 for a total of $500 (not including the cost of ink!) or with buying 50 regular CDs and labels at $33 each for a total of $660 (also not including the cost of ink). This is by far the cheaper way to go, but you cannot print the sermon title directly onto the disk. My church takes clear return address labels and puts the sermon title on that way. You can purchase 1500 labels for $10 from Amazon. This certainly isn't the classiest way to print your discs, but it works. You probably can't even tell the label is there unless you knew it or looked up close.

Write on CD with a Marker
So you're on a low, low, low budget, and this is your very first attempt at working with CDs. You can always take the good 'ole Sharpie and write on the disc. The very minimum cost to you is the discs and some cheap paper sleeves for a total of roughly $35. This looks really tacky, though, and even return address labels with no printed design would be an improvement. That would total roughly $45.


Conclusion
Regardless of which method you use, or both. You should actively promote them to your congregation. If they are constantly made aware that you have this ministry, they will remember it when they're sick and want to hear the sermon, when someone else wants to hear it, or when they want to share what they heard with a friend (as possibly an evangelistic tool!). Don't do it every Sunday, but once every two-three weeks works fine.

Did you like this article? Please share it on Facebook, Twitter, or Google+. You never know when one of your friends is looking for a blog like this. Plus I would really appreciate the promotion and exposure considering how new my blog is.


Design by Free WordPress Themes | Bloggerized by Lasantha - Premium Blogger Themes | Best Web Hosting Coupons